What Phase 2 Is Actually About
In Phase 1, the pipeline built firmware and proved it compiled. GitHub's hosted runners handled that work with virtual machines in the cloud that spin up, run the build, and disappear. Clean, free, and completely disconnected from any physical hardware.
That's fine for compilation checks. It's useless for everything else.
You cannot flash an ESP32 from a GitHub-hosted runner. You cannot run serial validation tests on a physical dev board from a server you don't control. You cannot do hardware-in-the-loop testing; the kind that actually proves firmware behaves correctly on real silicon. At least you can't without a real machine with real hardware attached to it.
Phase 2 changes the infrastructure. Instead of GitHub's servers running the pipeline, my homelab does. A Proxmox virtual machine running Debian Linux, sitting on hardware I own, with the ESP32 connected via USB. When code gets pushed to the repository, GitHub signals that machine, the runner picks up the job, builds the firmware, flashes it to the board, and runs the tests. The result, pass or fail, gets reported back to GitHub.
This is what embedded Continuous Integration actually looks like. Not a concept. A running system.
The Infrastructure: Homelab → Proxmox → Debian VM
The physical setup starts with my homelab server running Proxmox VE , a bare-metal hypervisor that lets me run multiple isolated virtual machines on the same hardware. Think of it as the server equivalent of having separate, clean workstations for different purposes, except they all share the same physical machine and you manage them through a web dashboard.
Inside Proxmox, there's a Debian Linux VM that serves as the CI worker. This is the machine that will actually run the GitHub Actions jobs. Using a VM rather than the bare metal directly gives a clean, reproducible environment. The runner has exactly the dependencies it needs and nothing else, and if something goes wrong it can be rebuilt from scratch without touching the underlying server.
The ESP32 development board is physically connected to this VM via USB, exposed as /dev/ttyUSB0. That's the serial port the pipeline uses to flash firmware and communicate with the board during testing.
Before the runner could touch anything, the environment needed to be fully configured:
- Linux server configured and network-accessible via SSH
- ESP32 connected and
/dev/ttyUSB0verified as the correct device path - PlatformIO installed for firmware builds and flashing
- Python 3 configured for the test scripts
- PySerial installed so the serial test script can communicate with the board
Every one of those steps had to be right before the runner would be useful. A GitHub runner that can't reach the ESP32 is just a slow version of the hosted runner, it builds firmware but can't do anything with it.
Registering the Runner: Connecting the Server to GitHub
The runner registration process is GitHub's authentication handshake with your machine. GitHub generates a one-time registration token. You download the GitHub Actions runner software onto your server, run the configuration script with that token, and the machine authenticates itself to the repository.
# Download the runner package
mkdir actions-runner && cd actions-runner
curl -o actions-runner-linux-x64-2.336.0.tar.gz \
-L https://github.com/actions/runner/releases/download/v2.336.0/actions-runner-linux-x64-2.336.0.tar.gz
tar xzf ./actions-runner-linux-x64-2.336.0.tar.gz
# Configure it
./config.sh --url https://github.com/<your-repo> --token <registration-token>
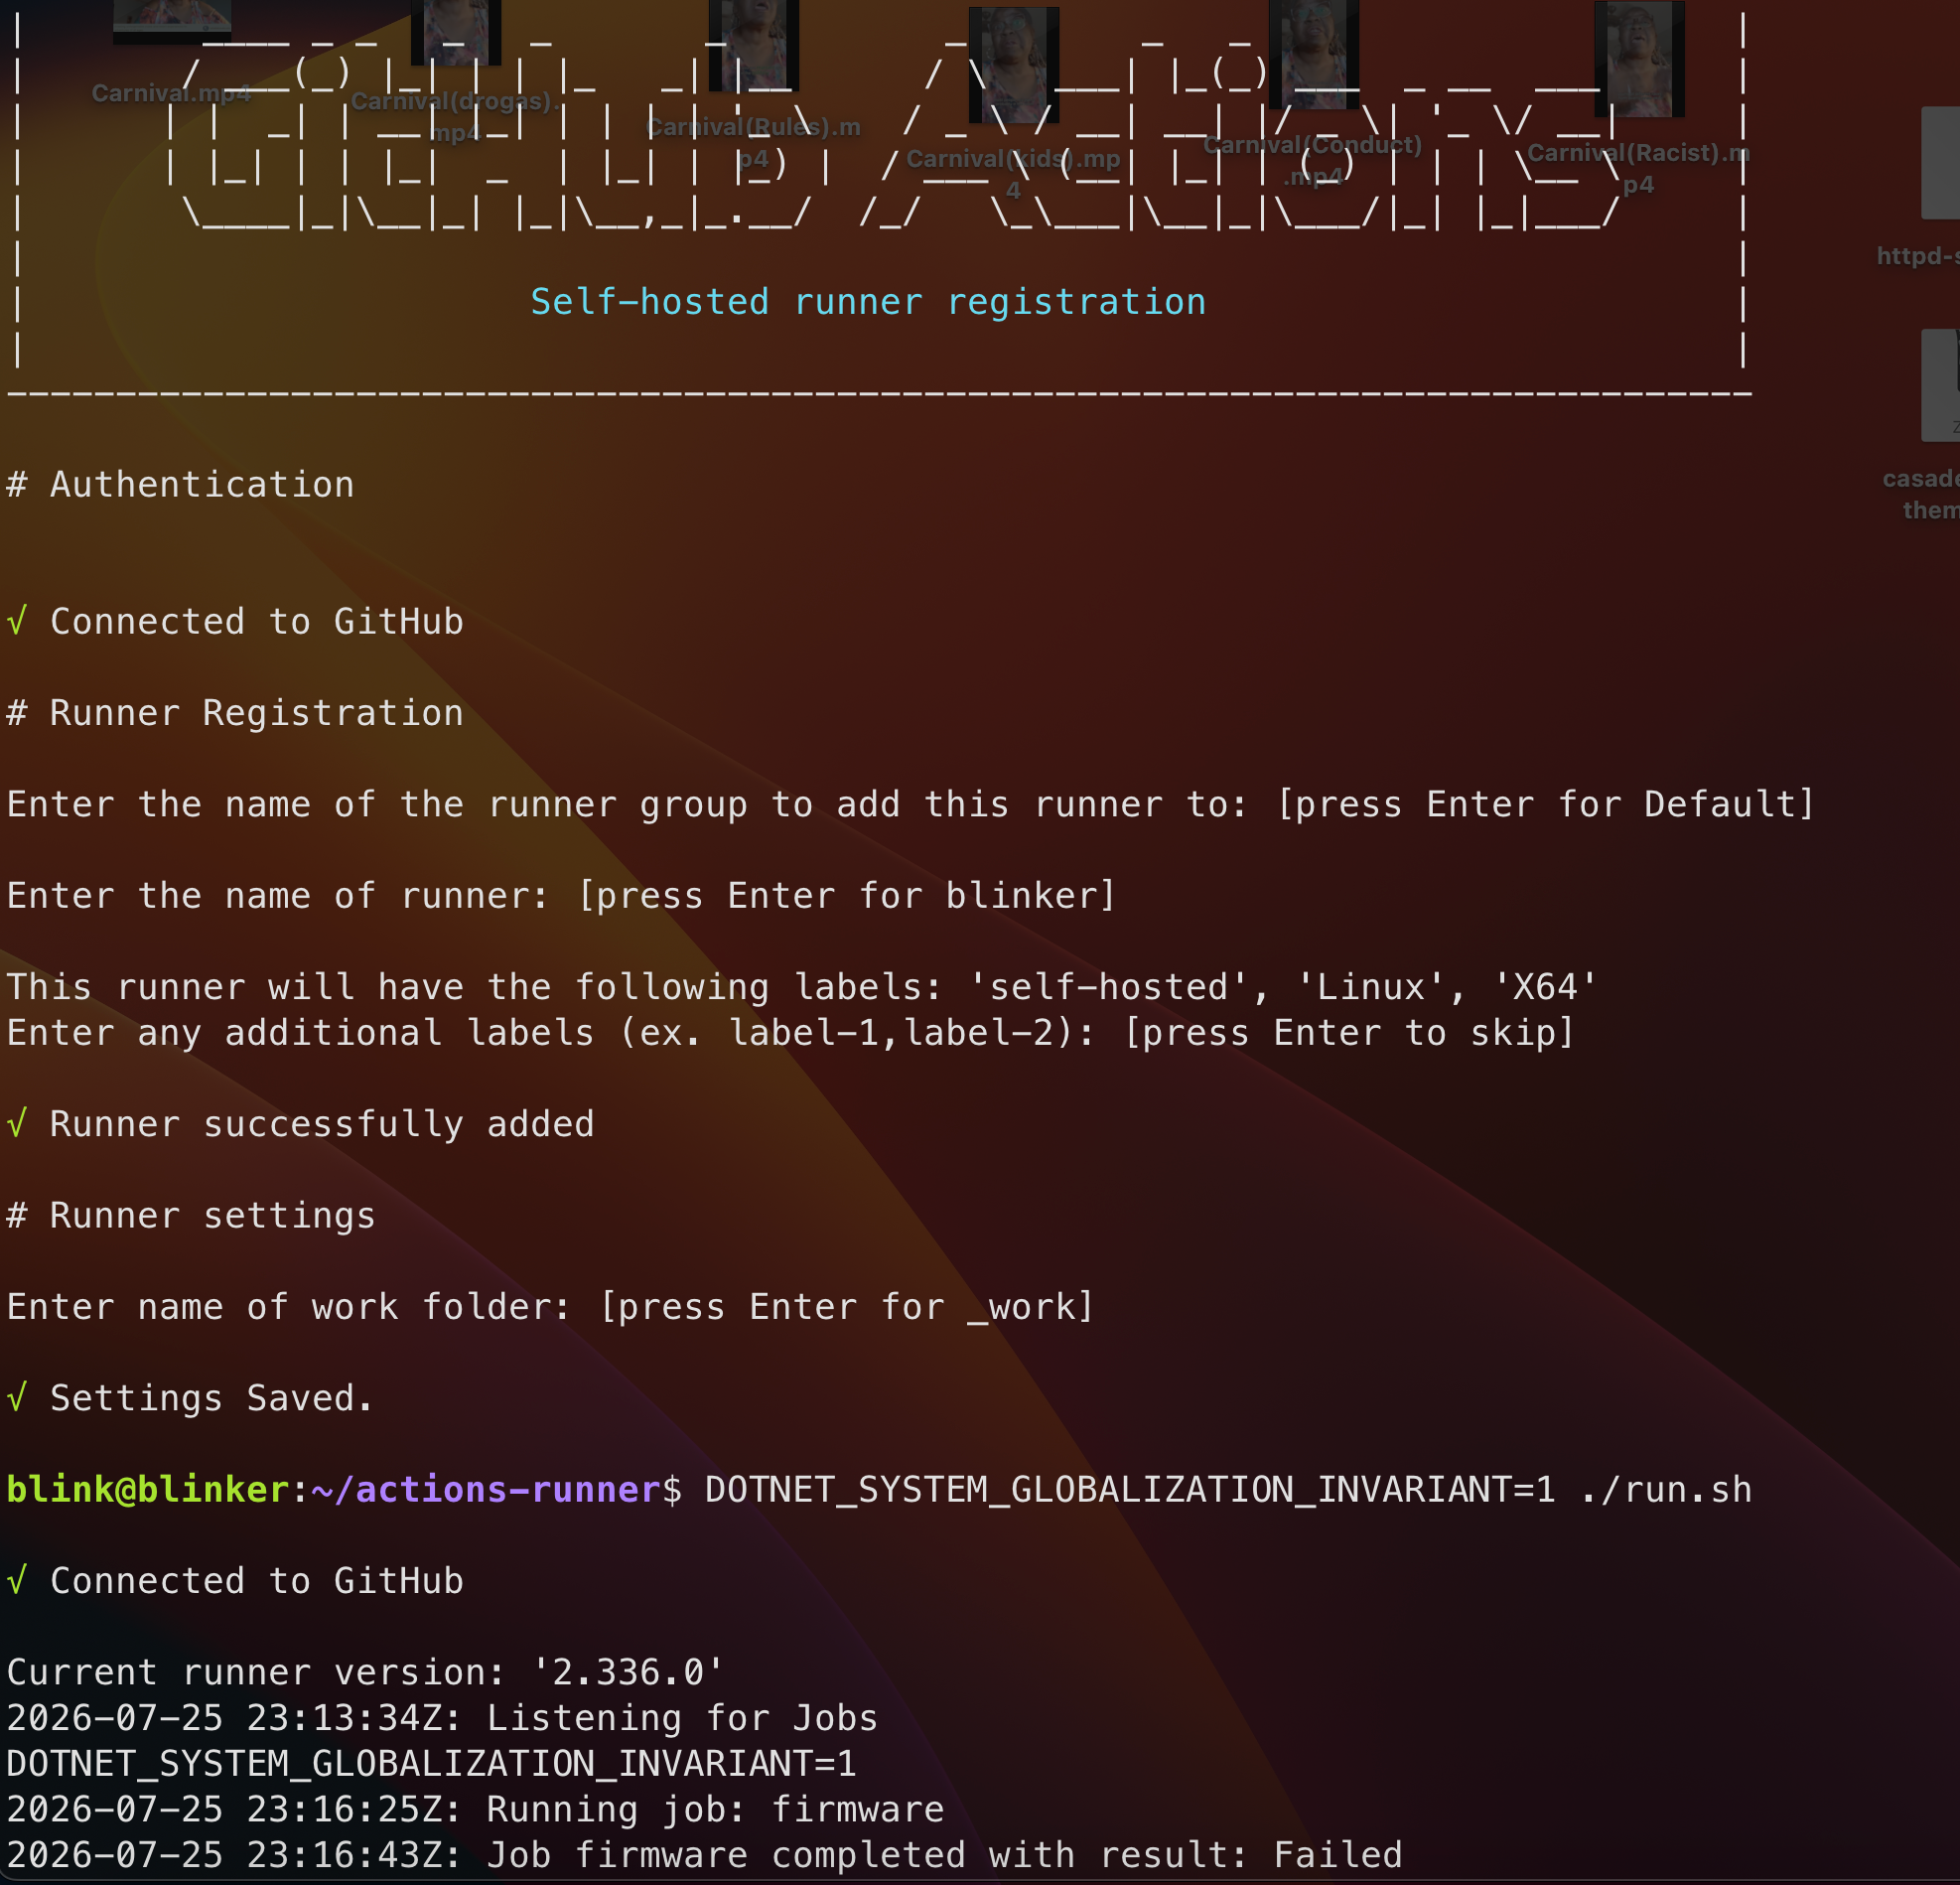
During configuration you assign the runner a name and labels. The name here is blinker, running on a machine called blink@blinker, because naming your homelab servers like characters is a lifestyle choice I stand by. The labels assigned automatically are self-hosted, Linux, and X64 . These are what the workflow YAML uses to route jobs to the right runner.
# Start the runner with the required environment variable for .NET on Debian
DOTNET_SYSTEM_GLOBALIZATION_INVARIANT=1 ./run.sh
The DOTNET_SYSTEM_GLOBALIZATION_INVARIANT=1 flag is one of those details that doesn't show up in the quickstart guides. The GitHub Actions runner is built on .NET, and on minimal Debian installations without full ICU locale data installed, the runner will fail to start without this variable set. This is the kind of thing you find out by watching the process crash and reading the error.
Once the runner starts, the terminal output confirms everything:
√ Connected to GitHub
Current runner version: '2.336.0'
2026-07-25 23:13:34Z: Listening for Jobs
At that point, the server is registered, authenticated, and waiting. Any job in the repository workflow that specifies runs-on: self-hosted will be routed to this machine.
The Workflow File: What the Pipeline Actually Does
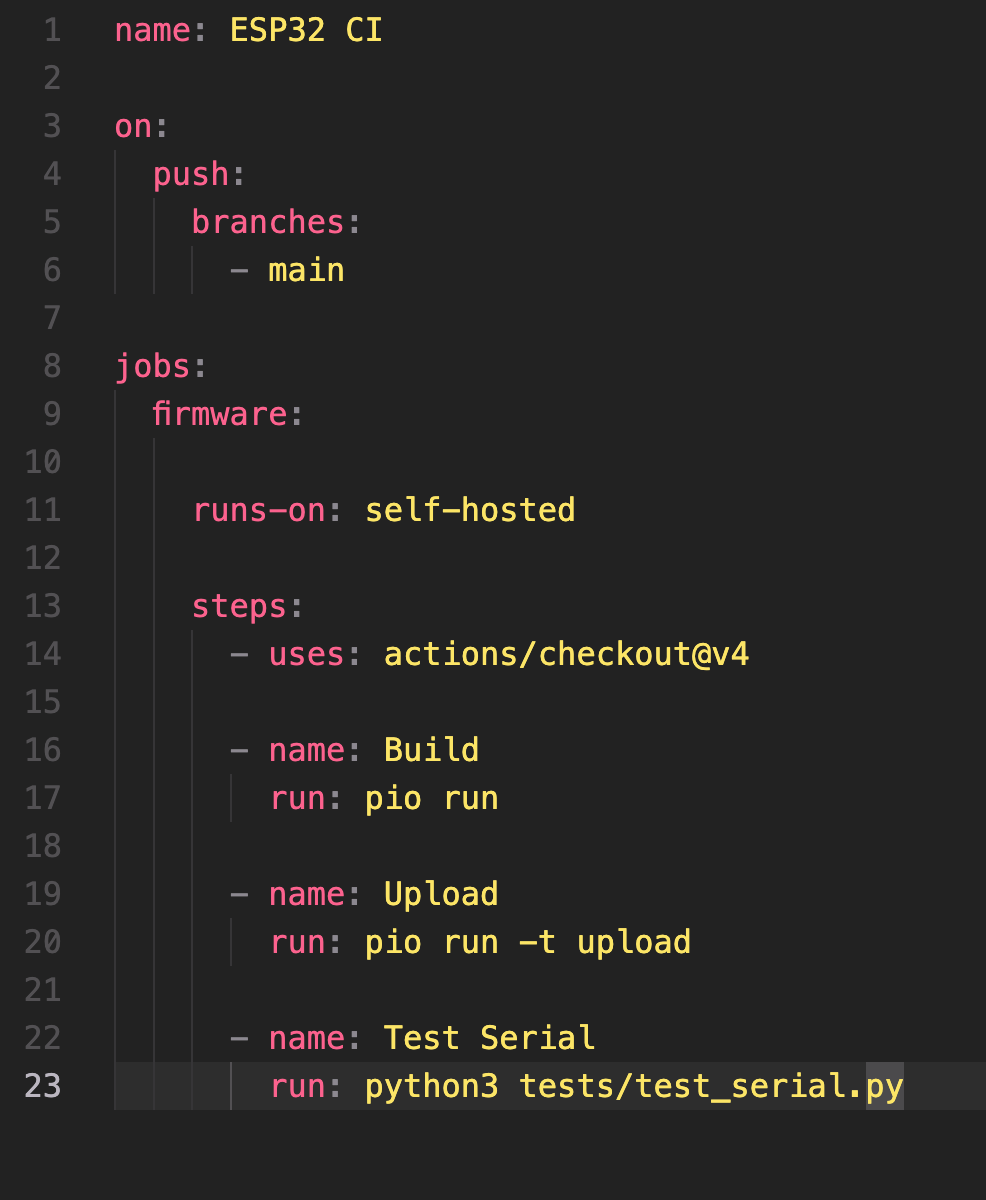
The GitHub Actions workflow file is the definition of what happens when code gets pushed. Every step, every command, in order:
name: ESP32 CI
on:
push:
branches:
- main
jobs:
firmware:
runs-on: self-hosted
steps:
- uses: actions/checkout@v4
- name: Build
run: pio run
- name: Upload
run: pio run -t upload
- name: Test Serial
run: python3 tests/test_serial.py
Four steps. Let's break down what each one actually does and why the order matters.
Checkout pulls the latest code from the repository onto the runner machine. Without this, the runner has no source files to work with — it's just a machine sitting there.
Build runs pio run, which invokes PlatformIO to compile the firmware. This is the same step that ran in Phase 1 on GitHub's hosted runners. Now it runs on the homelab machine. If the firmware doesn't compile, the pipeline stops here.
Upload runs pio run -t upload, which tells PlatformIO to flash the compiled firmware binary to whatever device is connected. On this machine, that's the ESP32 on /dev/ttyUSB0. PlatformIO handles the flashing protocol automatically — it detects the board type from platformio.ini, uses the appropriate upload method, and writes the firmware to flash memory on the device.
This is the step that required physical hardware. A GitHub-hosted runner has no /dev/ttyUSB0. It has no USB port. It can't flash anything. The self-hosted runner on the homelab machine can, because the ESP32 is actually plugged into it.
Test Serial runs the Python validation script. After flashing, the script connects to the board over the same serial port, reads the output, validates the expected behavior, and exits 0 or 1. That exit code is what GitHub Actions interprets as pass or fail.
The Pipeline Flow: Push to Pass (or Fail)
Here's what the full CI loop looks like from commit to result:
Git Push
↓
GitHub receives the push
↓
GitHub signals the self-hosted runner
↓
Runner pulls latest code (checkout)
↓
PlatformIO compiles the firmware
↓
PlatformIO flashes the firmware to the ESP32 via /dev/ttyUSB0
↓
Python serial test script connects and validates behavior
↓
Exit 0 (PASS) or Exit 1 (FAIL)
↓
Result reported back to GitHub — visible on the commit
Every developer on the project can see the result of every push without manually testing anything. If a code change breaks the firmware build, the pipeline catches it before it merges. If the firmware builds but behaves incorrectly on real hardware, the serial test catches it. If it flashes and passes all tests, the commit gets a green check.
That's continuous integration. Not "we run tests sometimes." Every push, automatically, against real hardware.
Current Status: The First Job Ran. It Failed. That's the Point.
Looking at the terminal output from Image 1:
2026-07-25 23:16:25Z: Running job: firmware
2026-07-25 23:16:43Z: Job firmware completed with result: Failed
The runner picked up the job. It ran. It failed 18 seconds later.
This is not a problem. This is the system working exactly as designed.
A failure at this stage almost certainly means one of three things: a dependency missing from the runner environment, a device path issue with /dev/ttyUSB0, or a configuration detail in the workflow YAML that needs tuning for this specific machine. All of those are normal, expected, and fixable. The important thing is that the job reached the runner, the runner executed the pipeline, and the failure was reported back to GitHub with enough log output to diagnose.
A pipeline that never fails hasn't been tested. Finding the failure mode early — while the environment is still being set up — is better than finding it at 2am when someone's trying to merge a hotfix.
The tasks still in progress:
| Task | Status |
|---|---|
| Linux server configured | ✅ Complete |
| SSH working | ✅ Complete |
| ESP32 connected | ✅ Complete |
| /dev/ttyUSB0 verified | ✅ Complete |
| PlatformIO installed | ✅ Complete |
| Python configured | ✅ Complete |
| PySerial installed | ✅ Complete |
| GitHub Runner downloaded | ✅ Complete |
| GitHub Runner Registered | ✅ Complete |
| Runner executing jobs | ✅ Complete |
| Build step passing | 🔧 In progress |
| Upload step passing | 🔧 In progress |
| Serial tests passing | 🔧 In progress |
| Clean end-to-end pass | 🔧 In progress |
The runner is up. The workflow is defined. The first job ran. What's left is debugging the failure and getting all four steps to pass cleanly.
Why a Self-Hosted Runner Changes the Conversation
From a hiring or technical leadership perspective, this setup is worth understanding specifically.
Most developers who claim CI/CD experience have used GitHub Actions or Jenkins to run builds on hosted infrastructure. That's a legitimate skill. But it's also the lowest-friction version of CI. You're using someone else's machines, someone else's network, and you never have to think about what's underneath the runner.
A self-hosted runner in a homelab environment requires a completely different knowledge set. You're provisioning and maintaining the server. You're managing the Linux environment and its dependencies. You're handling USB device permissions so the runner process can write to /dev/ttyUSB0. You're configuring the runner to start automatically on reboot, survive network interruptions, and report failures back to GitHub reliably.
And in the case of embedded CI specifically, you're doing all of that while physical hardware is physically attached to the machine. The ESP32 doesn't care that GitHub had a maintenance window. The serial port doesn't care that you haven't set the right udev rules for the USB device. The pipeline doesn't care that the .NET runtime is missing locale data and needs an environment variable to compensate.
These are the details that separate someone who has read about CI/CD from someone who has built it in a real environment. The homelab is where that gap closes.
What's Coming in Phase 3
Phase 2 ends when the pipeline runs end-to-end without intervention; build, flash, test, pass, reported green to GitHub. That clean run is the milestone.
Phase 3 picks up from there and adds the unit testing layer. PlatformIO's native test framework running on the native environment target (the one that's currently failing in Phase 1), executing logic tests without requiring the physical board. The combination of hardware-in-the-loop tests (Phase 2) and unit tests (Phase 3) means every push is validated at two levels: does the logic work, and does the firmware work on real hardware.
Follow the series to see the first clean end-to-end pass and the debugging that gets there.